Last Updated on May 16, 2025 by Kari-Ann Ryan
Moving is one of those life events that can easily feel overwhelming. Between the countless boxes, trying to remember what’s packed where, and worrying about fragile items—things can spiral into chaos quickly. Fortunately, there’s one simple tip that professional movers rely on to make the process smoother: color coding your moving boxes.
Think of it as creating a colorful roadmap for your move. Assigning specific colors to different rooms or item categories transforms packing, loading, and unpacking into a far more organized experience. Instead of sifting through box labels or opening each one to find your essentials, color coding helps you know at a glance exactly where each box belongs. No guesswork. No misplaced belongings.
At Mid-West Moving and Storage, we’ve helped countless families and businesses relocate successfully—and time and again, this small packing strategy has proven to make a big difference.
Why Color Coding is So Effective
Color coding isn’t just about aesthetics—it’s a practical, psychological time-saver. The human brain processes color faster than it does words, which means a simple colored sticker or strip of tape can convey information much more quickly than a handwritten label.
By assigning a unique color to each room or type of item, boxes become instantly recognizable. Whether you’re working with professional movers or doing it yourself, everyone involved in the move can quickly identify where each box should go without stopping to read every label. This helps reduce confusion, avoid misplaced items, and significantly streamline both loading and unpacking.
How to Color Code Your Moving Boxes: Step-by-Step
Ready to color code your move like a pro? Here’s a straightforward step-by-step guide:
Step 1: Plan Your Color Palette Strategically
Choose a limited but distinct set of colors—ideally between 5 and 8—to avoid confusion. Assign each color a specific meaning before you start packing. Sample Palette & Assignments:
| Color | Room/Category | Additional Notes |
| Blue | Bedrooms | Use calm shades for restful areas |
| Red | Kitchen | Bright color signals priority unpacking |
| Green | Bathrooms | Symbolizes freshness |
| Yellow | Living & Dining Rooms | Energetic, high-traffic areas |
| Orange | Fragile Items | Warning color for careful handling |
| Purple | Home Office/Study | Represents creativity and focus |
| Black | Heavy Boxes | Denotes caution when lifting |
Tips for Choosing Colors
- Consider Colorblindness: Avoid combinations like red/green or blue/purple for helpers who may have color vision deficiency. Pair colors with symbols or text.
- Keep it Consistent: Use the same shade of each color throughout your move to avoid confusion.
- Choose Waterproof Materials: Use durable colored tape or waterproof markers to ensure colors stay visible despite weather or rough handling.
Step 2: Develop Your Color Coding System with a Clear Key
Create a master chart that lists every color alongside its assigned room or category. Include examples and icon suggestions for each category. Example Key:
| Color | Room/Category | Icon or Symbol | Notes |
| Blue | Bedroom | Bed Icon | Pack bedding, clothes, decor |
| Red | Kitchen | Fork & Knife Icon | Fragile dishes, appliances |
| Orange | Fragile | Broken Glass Icon | Wrap carefully; label “Fragile” |
Print and share this key with everyone involved in the move—movers, friends, or family members—so everyone is on the same page
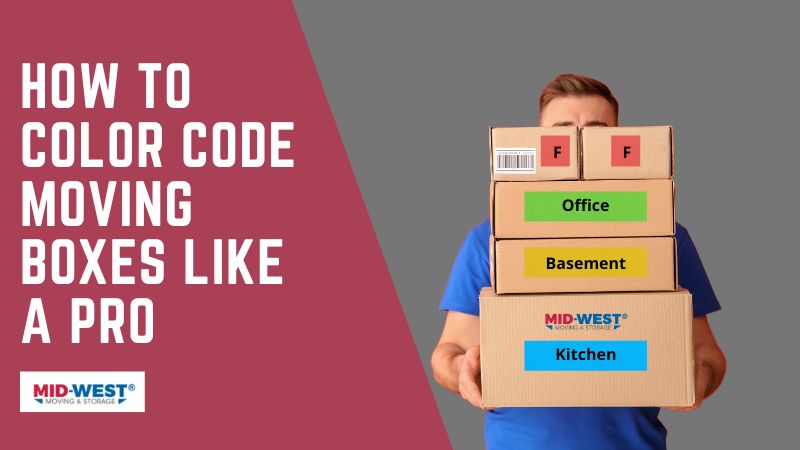
Step 3: Label Boxes with Precision and Clarity
Here’s how to label your boxes so your color code really works:
- Apply Colored Tape or Stickers on at least two visible sides of each box. This ensures that the box can be identified regardless of orientation.
- Write Key Information with Matching Colored Markers: Include:
- Room name (e.g., “Kitchen”)
- Box number (e.g., “Box 12 of 30”)
- Contents summary (e.g., “Plates & Glasses”)
- Special instructions (e.g., “Fragile,” “Heavy,” “Open First”)
- Use Symbols or Icons: Add quick visual cues like fragile glass symbols or arrows to indicate “This Side Up” for delicate items.
- Seal Boxes with Colored Tape: Use the designated color tape to seal boxes. This doubles as a color indicator and protects box integrity.
Pro Tip: Use Different Label Types for Different Box Sizes
For smaller boxes or containers, colored stickers and hand-written labels work best. For larger boxes or furniture items, use color-coded tags or large tape strips.
Step 4: Create a Detailed Inventory System to Track Boxes
Color coding is powerful, but pairing it with an inventory system maximizes efficiency.
- Assign Box Numbers: Number each box sequentially within its color category (e.g., Blue-01, Blue-02 for bedrooms).
- Log Contents: Write down a summary of each box’s contents in a notebook, spreadsheet, or inventory app.
- Choose Your Tool: Digital tools like Sortly, BoxMeUp, or even Google Sheets work great. Include columns for color, box number, room, and content description.
- Add Photos: Take pictures of packed boxes and their contents for an added layer of detail and proof for insurance claims.
- Backup Your Inventory: Save a copy on your phone, cloud storage, or email so you can access it anywhere.
Step 5: Communicate Your System to Movers and Helpers
Sharing your system is essential for it to work:
- Print Your Color Coding Key: Hand out copies or display them in key packing/loading areas.
- Host a Brief Meeting: Walk movers or helpers through the system and answer any questions.
- Label the Truck or Moving Zones: If possible, organize the moving truck by color zones to match your boxes.
Advanced Techniques: Beyond Basic Color Coding
- Use QR Codes and Digital Tags: Generate QR codes linked to your digital inventory and stick them on the boxes. Scanning a code instantly reveals box contents and special instructions.
- Pack “Open First” Boxes: Use a neon color or bright orange tape to mark boxes with essential items for the first day/night after moving—think toiletries, bedding, basic kitchenware, and chargers.
- Color Code by Priority Level: Add a system within each room’s color for priority unpacking:
- Darker shade = unpack first
- Lighter shade = unpack later
This prioritization helps when time is limited post-move.
Common Challenges with Color Coding—and How to Avoid Them
Even though color coding is a highly effective strategy for organizing a move, it’s not completely foolproof. Without a bit of planning, small mistakes can undermine the system. Here are some of the most common pitfalls people encounter—and how to sidestep them:
- Getting Carried Away with Too Many Colors
One of the easiest mistakes is using too many colors. While the idea is to stay organized, assigning 12 or more colors can actually create more confusion than clarity. Instead, limit your system to around 6 to 8 distinct, easily distinguishable colors. If you’re working with similar shades (like red and pink), consider adding icons or patterns to help differentiate them at a glance. - Inconsistent or Incomplete Labeling
Color coding works best when paired with clear written labels. It’s not uncommon to forget to label a few boxes or mix up color assignments during a rushed packing session. To avoid this, double-check that each box is both color-coded and marked with the room name and a quick list of contents before sealing it up. - Misplacing Your Color Key
The entire system hinges on the color key—and losing it can throw everything off track. Create multiple copies: tape one near the front entrance of both your old and new homes, keep one in your moving binder or folder, and take a photo of it on your phone. This ensures you always have a quick reference on hand. - Movers or Helpers Not Following the System
Even the most organized labeling won’t help if your moving team doesn’t understand it. Take a few minutes before the move to explain the system to everyone helping out. Post printed color charts near entrances, and add matching color signs on the doors of each room in the new home. The clearer the system, the more likely everyone is to follow it. - Labels Getting Damaged in Transit
Tape peeling off, ink smudging, or labels fading can all render your careful color coding useless. To prevent this, use high-quality, waterproof moving tape and permanent markers. Avoid placing labels where they might rub off during transport, and consider reinforcing them with a clear packing tape overlay for extra durability.
With just a bit of foresight, these minor obstacles can easily be avoided—allowing your color-coded moving system to do exactly what it’s designed to do: bring order to the chaos of moving.
Get in Touch With Mid-West Moving and Storage Company
Moving doesn’t have to be stressful. At Mid-West Moving & Storage, we’ve helped thousands of families and businesses move across Chicagoland—and we’re here to help you, too.

Whether you’re moving down the street or across the state, we offer full-service residential moving for both local and long-distance moves. We also specialize in commercial relocations, making it easy for businesses to move without missing a beat.
When you hire our team, you’re getting more than just movers—you’re getting trusted professionals who treat your belongings like their own. Give us a call or request a free quote online.

Director of Marketing & Development
Kari-Ann Ryan is a dynamic marketing strategist with a proven track record in brand development, corporate visibility, and business growth. As the Director of Marketing & Development for Mid-West Moving & Storage and Chicago Office Movers, she leads all branding, marketing, and business development initiatives, driving awareness and engagement across multiple industries.
With extensive experience in multi-brand marketing, nonprofit fundraising, event planning, and retail management, Kari-Ann brings a comprehensive and results-driven approach to her role. She is a dedicated leader in the business community, actively involved in the Schaumburg Business Association and the GOA Regional Business Association. She also serves as a Board Member for the Alzheimer’s Association Illinois Chapter, reinforcing her commitment to advocacy and philanthropy.
In addition to her corporate role, Kari-Ann is the founder of LMJ’s Lost Souls – Alzheimer’s Fund, a nonprofit organization dedicated to awareness, education, and fundraising for Alzheimer’s research and support.
She holds a Bachelor of Business Administration in Marketing from Western Michigan University and is Certified in Constant Contact Email Marketing, with expertise in social media strategy and digital engagement.